
Google Analytics has cleaned up ghost spam quite a bit since the outbreak between 2015-2017. However, those spammers that do break through still lure unsuspecting targets to click on dangerous websites and in the very least, cause much confusing when reviewing analytics. Clearly it’s still working or these trolls would be out of business.
If you are most concerned about multiple clicks from odd locations and worry it’s eating up your ad spend, check out our quick quide on Weird Analytics Traffic.
Before we go into setting up a filter for your analytics account so you are only viewing the relevant website traffic you care about most, let me caution you to avoid the following tragic errors that could put your website at risk:
Never visit the suspicious URL. Most of the time they’ll try to sell you something or promote their service, but some spammers might have some malicious scripts on their site.
Never install scripts from unknown sites. If you have already done so, remove it immediately and scan your site for malware.
High traffic numbers not making sense.
A bot is a software bit that runs automated scripts over the internet for different purposes. There are many types, but we’ll call them “good” (checking for copyright infringement, indexing your website for search engines) and “bad” (scraping your content prior to it being indexed).
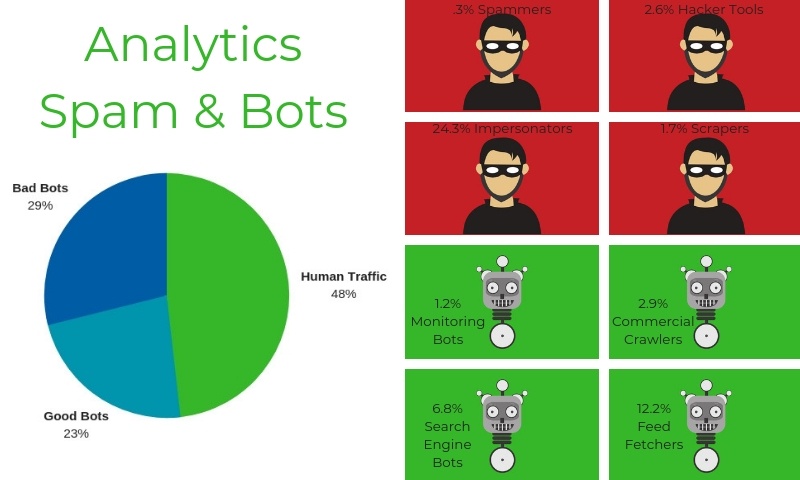
Since you likely have limited availability to completely nix these bad bots, you do have the power to not have their presence mess with your reports by using Google Analytics filters.
Analytics Filtering First Steps:
1. Create an unfiltered view.
Best practices for Google Analytics advises you create/keep an unfiltered view. Not only will you be able to monitor the efficacy of your filters, but it will be your backup in case something goes wrong.
2. You Need Google Analytics Editing Permissions.
You will need edit permissions at the account level to create filters; edit permissions at view or property level won’t work.
3. Filters Don’t Work Retroactively.
Google Analytics aggregated historical data can’t be deleted. You will be unable to apply the filter to historical reports.
4. The changes made by filters are permanent!
If your filter is not correctly configured because you didn’t enter the correct expression (missing relevant entries, a typo, an extra space, etc.), you run the risk of losing valuable data FOREVER; there is no way of recovering filtered data. This is why we advise you have an unfiltered view to pull all of your data from in the event you have to scrap any mistakes and still get the information you need.
Analytics Filtering Types
There are two main types of filters: predefined and custom.
Predefined filters are very limited and not always what’s most relevant to me. Custom filters allow regular expressions, which makes them a lot more flexible. These are your reports, afterall, so don’t be afraid to make them yours!
Within the custom filters, there are five types: exclude, include, lowercase/uppercase, search and replace, and advanced. We are only going to go over the most relevant to your viewing accurate traffic from your organic and advertising efforts.
Google has already done an amazing job at providing as much in-depth information with screen shots to guide you. Why reinvent the wheel when you can learn from the Masters themselves? Here are the basic steps if you are in a pinch and are relatively comfortable using Google Analytics, but should you require more guidance, you’ll want to check out Googles Filter guide.
 Create a Filter at the Account Level*
- Sign in to Google Analytics..
- Click Admin, and navigate to the account in which you want to create the filter. (If you don’t manage multiple accounts as a Google Partner or Agency, you’ll already be in the account you want to filter if is your only website/account.)
- In the ACCOUNT column, click All Filters.
- Click + New Filter. (If this button is not visible, you do not have the necessary permission.)
- Select Create new Filter.
- Enter a name for the filter.
- Select Predefined filter to select from the predefined filter types.
- Select Custom filter to construct a custom filter from the options we provide. If you create a custom filter, consult our definitions of the filter fields.
- From the Available views list, select the views to which you want to apply the filter, then click Add.
- Click Save.
By default, view filters are applied to the data in the order in which the filters were added. So, if there are existing filters for a view, your new filter is applied after them.
 Create a Filter at the View Level*
- Sign in to Google Analytics..
- Click Admin, and navigate to the view in which you want to create the filter.
- In the VIEW column, click Filters.
- Click + New Filter. (If this button is not visible, you do not have the necessary permission.)
- Select Create new Filter.
- Enter a name for the filter.
- Select Predefined filter to select from the predefined filter types.
- Select Custom filter to construct a custom filter from the options we provide. If you create a custom filter, consult our definitions of the filter fields.
- From the Available views list, select the views to which you want to apply the filter, then click Add.
- Click Save.
Applied Google Analytics Filters and Still Confusing Traffic?
If after applying your Google Analytics Filters you still see confusing or contradicting numbers, please reach out to your Account Manager through Intercom. They will be happy to look through our very detailed reporting to ensure there are no errors effecting your ad spend and results.
*Detailed steps curtosy of Googles Filter guide.